Monday, October 3, 2011

Connor, My New Wreath, and a Tutorial


Connor had to go to the doctor today to get a shot.  He weighed 10 lbs 12 oz!  He has gained 8 pounds in the past 17 weeks.  I am so proud of my little boy.  Here's a pic of his super cute outfit he wore today...
Isn't he adorable? :)
He had on converse sneakers too, but he wouldn't keep his feet still for a picture...
Connor also had his first bite of baby oatmeal yesterday.  He just spit it out, so we'll try again in a couple of weeks...


I just have to show him off...
I decided my front door needed a little sprucing up, so I took a wreath my mom had made a couple years ago, added some pumpkins and ribbon, and turned it into this:
Much better!
Now for the tutorial...


After I made an appliqued initial onesie for Connor, my friend told me she wanted me to make shirts for her girls.  Here's how to make your own!

You will need:
a shirt
fabric (it doesn't have to be a big piece)
coordinating thread
fusible webbing like Wonder Under
iron and ironing board
sewing machine and sewing notions

Okay, here goes...
Wash and dry your fabric and your shirt.  Make sure you do this beforehand so the shirt doesn't shrink funny!
Find a design or font you like.  Print and cut it out.  I used Microsoft Office to do mine.  (A Cricut or Silhouette would make this step super easy.  Hint, hint Santa! ;)
This is the letter I'm using.  It was 300 pt font.
*IMPORTANT* Trace your letter BACKWARDS onto the paper side of your fusible webbing.  It doesn't work if you don't do it that way.  Don't ask me how I know ;)

Iron your fusible webbing to the wrong side (the back) of your fabric per the package directions.  I had my iron on the wool setting and held the iron on the applique for about 10 seconds.  Don't move your iron around like you are trying to get creases out, hold it in place, pick it up, and move it to another place.  Also, make sure your webbing is fused well.  If it isn't, the webbing may not sick to the fabric when you pull the paper backing away.


Cut your design out.

Remove the paper backing from the applique, making sure the webbing doesn't come off too.  Place the applique on your shirt.  Center it the best you can.

Lay a damp washcloth on top of the applique.  With the iron on the wool setting, hold the iron on the applique for about 15 seconds, then pick it up, and move it to another section of the applique.  Repeat this until the applique is fused to the shirt.

Now, there are several things you can do from this point out:
1.  Leave the shirt as it is.  The applique is fused to the shirt, and it can be worn.  The fusible webbing is supposed to be permanent, but it may still come off unless you sewn it on.
2.  Hand sew a blanket stitch around the outside.
3.  Hand sew a whip stitch around the outside.
4.  Machine sew a satin stitch around the outside.  You can use a very small zig zag stitch if your machine doesn't have a satin stitch.  That's what I have to do.
5.  Machine sew a running stitch around the outside.  When you do this, over time, the edges of the applique will fray, making it look really cute. :)

I'm going to do a running stitch, because I want the edges to fray on this shirt.


Try to keep an even border.  It's okay if it's a little messy, because you won't see it as much once the edges fray.  Plus, it adds character. ;)  Make sure to go slow when you're doing this, it makes it easier.  There were some spots I did a stitch at a time.  I have heard that using a clear sewing machine foot makes this easier, but I don't have one.

Now go show off your new shirt!  (Make sure to tell everyone you did it yourself) ;)


Tuesday, September 27, 2011

A Trip to the Pumpkin Patch


Ashley, my dad, and I took Connor to a pumpkin patch today.  Needless to say, Connor slept through the whole thing.  But that's okay, we had fun anyway...


It's hard to not look scary in that position...


See?  Daddy had a hard time not looking scary, too...
I can't wait until he's big enough to take places and him not sleep the entire trip :)

Friday, September 23, 2011

The Best Baby Toy Ever

Here it is....
What is it, you ask?
It's a Fisher-Price Go Baby Go! 1-2-3 Crawl Along Snail.  (I know...that's a very long and complicated name for a toy).

Why is it so wonderful?
It plays music, talks, and lights up.  It has a mirror on it.  When baby starts to crawl, it can be rolled across the floor for baby to chase.  It's made out of chocolate.  Just kidding about that one.  But a girl can dream, can't she?  Finally, it's baby activated.  Now, I don't mean baby activated as in the baby has to push a button to make it work.  All baby has to do is touch it and it starts doing its thing!  Isn't that awesome?

I had been looking for a toy to keep Connor occupied.  He used to like his crib toy that lights up and plays music, but I think he has gotten tired of that lately.  He's not that into rattles or things like that.  But he LOVES this!  I bought it for him today, and he played with it a long time.  He kept batting at it and would smile and squeal when it would go off.  I have never seen him smile at a toy before :)  I am so glad I got it!

 A happy Connor makes a happy Mama! :D

Wednesday, September 21, 2011

Dear McDonald's

Have any of you guys ever found something delicious at a restaurant that you absolutely cannot live without? Then, the restaurant gets rid of the product, and you realize you can live without it, but you are still quite upset and maybe a little teary-eyed. Well, that was exactly how I felt about McDonald's honey mustard from several years ago. It was in a ketchup-ish package instead of the little tub. Ohh, it was so delicious. I dipped everything in it....my fries, my sandwiches. Sometimes, I would even take several packages home with me for my refrigerator stockpile. This was before they started charging for extra sauce. I have a simple little trick for that if your local McDonald's decides to charge for extra sauce. Wait until you already pay for your order. Then, ask for the sauce. The guy will say, "I'm sorry. That will be an extra so and so cents." Then, you say, "No problem," as you hand him your debit card. They won't want to run the debit card for an extra .16 cents. So, Voila! Free sauce like it should be! Anyway, back to the honey mustard. I decided to email McDonald's. Maybe they will tell me where I can find that delicious honey mustard. Here is my email:

Dear McDonald's,

Years ago, you guys had this absolutely delicious honey mustard. It was in a ketchup-like package instead of the little tub like it is now. Well, I really miss that sauce. Can you tell me what brand it was, so that I can find it in a store or order it online? By the way, congratulations on your new sweet chili sauce! It is incredibly fabulous! Have a wonderful day. Thank you!

Ashley McIntire


So, hopefully, they will get back to me on that. Have any of you guys tasted that wonderfully fantastic sweet chili sauce? Mmmmm! So tasty! Here is a recipe for it.

2 tablespoons water
2 1/2 tablespoons white vinegar
2 teaspoons cornstarch
1/4 cup light corn syrup
6 tablespoons sugar
2 teaspoons chili sauce (Huy Fong brand or similar)
1/4 teaspoon salt
dash ground cayenne pepper
dash garlic powder

In a small bowl, combine the water and vinegar. Whisk in cornstarch and make sure no lumps are in the mixture.

Place a small saucepan over medium heat and add the cornstarh mixture, corn syrup, sugar, chili sauce, salt, garlic powder and cayenne pepper. Stir frequently until mixture comes to a boil. Continue cooking for about 1 minute, then remove from the heat. Let the sauce cool, uncovered.

I will be making this sauce as soon as possible! Have a great day!

Ash

Monday, September 19, 2011

Ashley: The Friend

Let's start with my name...I'm Ashley! You should recognize me as "the best friend" from Alicia's "Do the Creep" post. She asked if I wanted to be a part of this fabulous blog, and I couldn't turn down the offer. Now, I don't have any children or a husband. Already, I don't seem that interesting. I have a Nathan, my boyfriend.
Nathan and I last Halloween

I also have a dog named Chester


   That cute picture of that dog....it's not Chester. That is my dead dog that I loved. Chester isn't fit for public display. At least not yet. He was born with a skin disease. He is on medicine for the rest of his life. He looks funny.
   Tell me more about yourself, you ask. Well, there is nothing much to tell. I graduate from college in the fall. I do not have a job. At least not yet. I like to write. Alicia and I have some awesome ideas for books. If I was, I don't know...Stephen King...I might be able to finish one. I think I will post parts of the books I have written on here. Maybe someone else will finish it for me. Maybe.


I do have a fantastic family. At least I did something right!

Anyway, my dog just pooped, and the turd is only halfway on the puppy pad. Thank goodness for Clorox wipes! Have a fabulous day!


Sunday, September 18, 2011

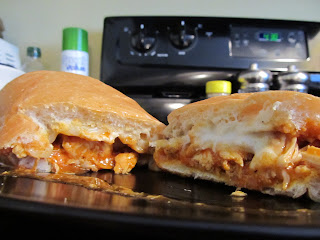
Crock Pot Buffalo Chicken Sandwiches

Man, these are good!
I found the recipe for the chicken on pinterest.  If you want to check out the original recipe, click here
I made the chicken just like she did, but I added a little bit to the sandwich to make it that much more special :)
The sandwich is juicy and flavorful, but boy, is it hot!  Make sure to drink you a big glass of milk when you eat it ;)

Crock Pot Buffalo Chicken Sandwiches
1 bag frozen skinless boneless chicken (The original post said a three pound bag, but I only had about two pounds, and it made four sandwiches).
1 bottle hot sauce (I used Frank's Buffalo Wing Sauce)
1 packet Hidden Valley Ranch mix (She said use almost the whole packet, I used all of it).
4 good sub rolls
butter
provolone cheese (Two slices per sandwich)
blue cheese dressing (optional-I liked this, Brian didn't.  But then again, I like blue cheese, and he doesn't).

Put chicken (do not thaw), whole bottle of hot sauce, and ranch mix in the crock pot.  Cook on high for three hours or on low for six.  When chicken is done, shred it and put it back it the crock pot with a couple pats of butter.  Let it cook on low for another hour or until you are ready to eat it.  Melt a pat of butter in a skillet and toast the inside halves of the sub rolls.  Spoon chicken onto bottom half of sub roll.  Cover with provolone cheese and microwave for 30 seconds or until cheese is melted.  Top with blue cheese dressing, if desired.  Pour a big glass of milk and enjoy!

Saturday, September 17, 2011

Crock Pot Apple Butter Two Ways

This week, my dad and I both made and canned crock pot apple butter.  We both just read some recipes online and just took bits and pieces and made it our own way.  They were both really good but totally different.  I'm posting the recipes below, but they are totally up to interpretation.  We both "dump cook," so there aren't any amounts, so add a little at the beginning and taste as you go to see if it needs more :)

Here's mine:
Alicia's Crock Pot Apple Butter

  • big bag of apples (we used macintosh and gala)
  • cinnamon
  • nutmeg
  • ground cloves
  • I think a tad bit of brown sugar would have been good, not much...just maybe 1/8 cup
Peel, core, and cube enough apples to fill your crock pot, or just use as many as you want. (I have a big crock pot, and I only filled it half full.  The apples cook down a lot.  My batch only filled three small jelly jars, so if you want some to put back, use as many apples as you can).  Add cinnamon, nutmeg, and cloves.  I added more cinnamon than anything.  Cook the apples until it looks like apple butter, stirring and tasting occasionally.  Once the apples start getting soft, take a potato masher or a wooden spoon to mush up the apples.  This makes a chunky apple butter.  Let cool.  Put in refrigerator or can.  If you don't can the apple butter, it should keep about a month in the fridge.

Daddy's Crock Pot Apple Butter

  • big bag of apples 
  • cinnamon
  • pumpkin pie spice
  • white grape/cranberry juice
Peel, core, and cube apples and put into crock pot.  Add cinnamon, pumpkin pie spice, and a small amount of juice.  Cook until mixture resembles apple butter, stirring and tasting occasionally.  When mixture is done, mix with a hand mixer.  This will make a smooth apple butter.

My apple butter was chunky and tasted a little like gingerbread.  It was more spicy than sweet.  Daddy's apple butter was smooth, and I could really taste the cranberry in it.

If you let the apples cook until the are just soft, they would make a great pie, fried pie, or cobbler filling :)

Plus, they make the house smell AWESOME!

While I was getting Connor to go to sleep last night, I found my new favorite Veggie Tales Silly Song.  Here it is...
And if anyone wants to watch the video A Snoodle's Tale I talked about a couple days ago, here it is as well...